Printer Output Settings


Step 1

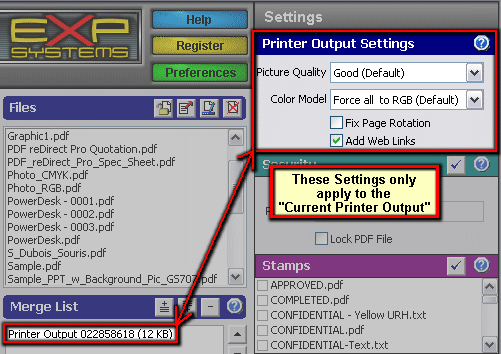
Changing Printer Output Settings

You can change various settings to optimize the quality and file size of your PDF. These settings only apply to the current printer output (ie the data just received from the printer, but not yet converted to a PDF). You cannot change these settings for a PDF file that has already been saved.


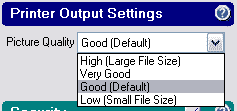
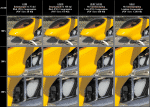
Picture Quality

You can reduce the file size by choosing a lower quality setting.

This savings is achieved by down sampling high resolution pictures in your document to a lower resolution and by increasing the compression ratio for pictures. Viewing the PDF document at 100% zoom with Low Quality will maintain the original picture quality, but the details will be lost when zooming in.

This setting will have no effect on documents which do not have pictures. Picture quality and resolution cannot be improved from the original picture. The resolution of the pictures are decreased to 150 dpi (Good setting) or 75 dpi (Low setting). The resolution of the original picture is maintained if you select High or Very Good settings.

(click picture for full size version)

Color Model

  • Force all to RGB. This option will force all objects to the RGB color model. This is the standard way of representing color objects and pictures and will keep pictures smaller. This is suitable for onscreen viewing and normal printing.

  • Keep CMYK objects. This is used for ouput that will be printed eventually by a professional publishing company and requires that your source software outputs the color objects and pictures using the CMYK color model. By using this setting, you can keep this format intact which may be required by your publisher, This typically will yield greater color fidelity when printed.

Fix Page Rotation

  • You can use this setting if the output shows up sideways.

Add Web Links

This setting allows you to convert Hyperlinks in the PDF into a clickable link. There are some limitations:

  • Text must use a standard font (either Arial, Helvetica or Times Roman).

  • Text that forms the link must be completely on the same line with no spaces.

  • The "hidden links" like [THIS] will not be converted. The link must be clearly spelled out longhand like this: www.exp-systems.com. Note: you can have greater flexibility in creating links if you use the stamp feature.

  • The following links are supported: "http://", "https://" "ftp://" "mailto:" and "www."

  • You cannot add hyperlinks to an already existing PDF file, only for a new PDF being created via the print menu.

  • This can be slow for documents with a lot of pages and text.


Setting Metadata of a PDF File


Step 1

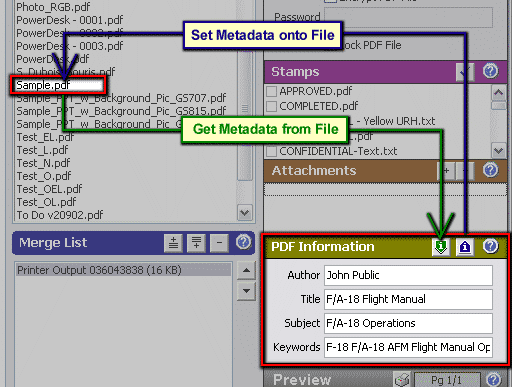
Enter Metadata information (optional)

If you wish, you can type in information about the PDF file which is searchable by databases and other utilities. You can enter information for the following four parameters:

  • Author. Note: PDF reDirect remembers this value between sessions.

  • Title

  • Subject

  • Keywords

  Setting Metadata information for an existing file (optional)
  • Select an existing file from the files list

  • Use the "Get Information" button to get the metadata information from the PDF file. This can be faster than typing information which you know already exists in an existing PDF file.

  • Use the "Set Information" to apply the metadata information onto an existing PDF file. This is handy in case you forgot to enter the information after the final PDF file was created.


PDF Output Settings


Step 1

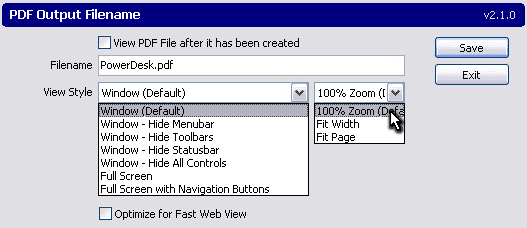
Changing PDF Output Settings

When saving PDF files, you can change the following settings.


View PDF File after it has been created

  • The output PDF file, once created, will be opened in your default PDF Reader program.

View Style

  • You can choose which features of the PDF Reader are shown (menubar, toolbar and the statusbar) or if you want the PDF to be displayed in presentation mode (ie full screen). You can ask PDF reDirect Pro to add "Navigation Buttons" so that  the user can click to the next page. Note that the new PDF Reader v7 now also adds navigation buttons when in full screen mode.

  • You can select how the page should be fitted in the viewer, either with 100% zoom, Fit to Page Width or Fit to Page Height

Optimize for Fast Web View

  • If this option is selected, the finalized PDF file will be processed to re-organize the contents such that they are sequentially ordered. This allows a PDF to open almost instantaneously when accessed via the internet, but will also create a slightly larger PDF file. Note: this feature is not available if the PDF must also be encrypted (ie if the user is asked to enter a password, or if the PDF is "locked" to prevent future editing).


Printer Resolution


Step 1

Changing Printer Resolution

The printer, by default, is set to 300 dpi (dots-per-inch) which give a good compromise between output quality and file size. You can manually adjust this setting through the printer properties control panel as follows.

  • Select the Start Menu

  • Choose "Settings", then "Printers and Faxes".

  • Right-Click on the "PDF reDirect Pro v2" printer, and choose "Properties"

  • Click on the "Printing Preferences" button.

  • Click on the "Advanced..." button

  • Change the Resolution in the Print Quality setting (you can choose from 72 dpi to 4000 dpi)

  • Click "OK" (3 times to close each window)


[Prev]      [Next]

©2003-2005 EXP Systems